Tutorial no.1 - Skyboxes
Part 1 - Making a skybox with Terragen
This part of the tutorial deals with the generation of a skybox using a tool called Terragen (http://www.planetside.co.uk/terragen).You should already have a basic understanding of it, as I won't be going into detail too much.I will only explain the steps needed to make a basic terrain and to render a skybox.So you better read the Terragen online tutorial first.

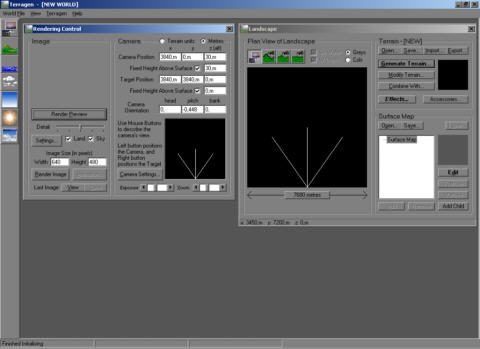
When you start Terragen, your screen will look something like this :


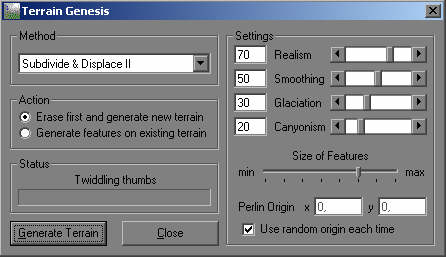
We first take care of the right Window to generate our landscape.Change to it and click on the "Generate Terrain" Button to bring up the following dialog :


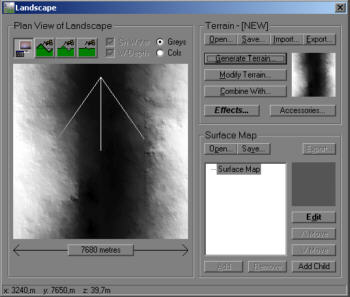
Under "Method" you can choose which method is used to generate your terrain and on the right side you'll find some options to tweak this method.I decided to make a little canyon for this tutorial.After you've made your choice, click on "Generate Terrain" and you'll see your newly generated landscape in the landscape dialog :


If you don't like the generated terrain, then you have the possibility to change it with three buttons in the upper section of the dialog.
Do you see that point and the three lines going out of it?Yes, this is the position of the viewer.With a left-click, you can change the position and with a right-click you can change the target point.
Now, it's time to choose the surface map.You could do a new one by yourself, but that'll take too much time, so I decided to load one of Terragens presets.Just click on the "Open..." button in the "Surface Map" section of the dialog and pick one.If it doesn't fit you, then just customize it.

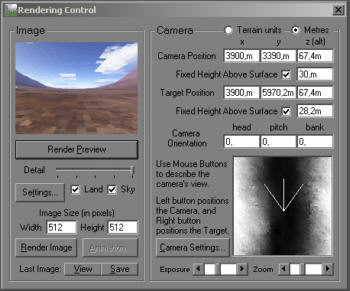
And now to the Rendering Control dialog :


At the top-left you can see a preview of your landscape that can be updated via the "Render Preview" button.But don't use the highest detail setting just for rendering your preview, as it'll take a long time.Use the middle detail setting instead and the highest one only for rendering your final image.
And under "Image Size", you can choose the size of your skybox texture.For your app, height should be the same as width.I choose 512x512, so that my skybox will look sharp enough to give a great effect.But remember that greater textures need more memory and perhaps will slow down your OpenGL-App.So if you use big skyboxtextures, you need also a good dynamic texture management if you decide to use a skybox in your game.
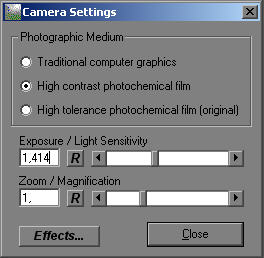
Before you can render your skyboxes, you'll have to change some settings to get the proper 90 degree field of view.Click on "Camera Settings" to pop up the following dialog :


You need to change the "Zoom" value to one, to get a 90 degree FOV.After this you can close the dialog and switch back to the Rendering Control dialog.Now set all the values for the camera orientation to zero if you haven't done this before.
Now you're ready to render, after you've set the details to max. The first part of the skybox is generated at a head orientation of 0 degree.This is the back image, the right image is rendered at a head orientation of 90 degree, the front image a 180 degree and the left image at 270 degree.
Then you'll have to change the head orientation to 0 degree and the pitch to 90 degree, to look up to the sky. This is your top image.The last thing to do is to change the pitch to -90 degree to render the bottom image.
Note that you can change the image naming at your will.I took this because it is easier than just naming the textures 0..5.

These are the 6 textures for my skybox :

Top
Back Right Front Left
Bottom


Part 2 - Using the skybox in your OpenGL-app
After you've created your skybox, it's time to use it in your OpenGL app.I'm not telling you the basic steps on how to set up a OpenGL Rendering Context or on how to enable texturing and I'm not telling you what you commands like glVertex3f do.If you want to know about it, then head to other sites, which tell you about the basics of OpenGL programming.

Requirements :
I used Delphi 6.0 for creating this little app, but it should run with Delphi 3 and up.In addition to run it, you need the OpenGL 1.2-Unit which you can find at http://delphi-jedi.org and the GLBmp unit for loading the textures. This unit can be found at here.I made some additions to the original unit which make it easier to set some texture parameters.The file is included in the download package.But don't use BMP as the fileformat for your images.Better use TGA or JPG, as my textures loaded from a BMP where flipped wrong, I don't know why, but I think it's a bug in the TGLBmp class.

Step 1 - Loading your images
Loading the textures with the TGLBmp class is very easy.I prefer to put all skybox textures into one array I also use one local array with the filenames, so that it's easier to load them in a loop :


procedure TForm1.LoadSkyBox;
const
 SkyBoxName : array[0..5] of String = ('BK', 'FR', 'DN', 'UP', 'LF', 'RT');
var
 i : Integer;
begin
ActivateRenderingContext(FDC, FRC);
for i := 0 to High(SkyBoxTexture) do
 begin
 SkyBoxTexture[i] := TGLBmp.Create;
 SkyBoxTexture[i].LoadImage(SkyBoxName[i]+'.jpg');
 SkyBoxTexture[i].SetTextureWrap(GL_CLAMP, GL_CLAMP);
 SkyBoxTexture[i].GenTexture(False, False);
 end;
GenerateSkyBox(512, 512, 512);
DeActivateRenderingContext;
end;

The globally declarated SkyBoxTexture array holds all our six textures and the array SkyBoxName, declared local in the LoadSkyBox procedure holds the corresponding filenames for every texture without the extension, so that you can easily change the loading procedure to your filename conventions.
After the rendering context has been activated, we start loading the textures in a loop.First you have to create your TGLBMP class then you load your image and set the texturewrap to GL_CLAMP for both the S and the T coordinate.This is necessary to make your borders look seamless.
Also notice that I changed the GenTexture procedure of the TGLBmp class.It now gets two parameters that are both boolean.The first is for loading the texture in S3 compressed format and the second tells the procedure to use anisotropic filtering.If you want to use these features, you must ensure that your gfx-card supports them.
But don't use texture compression for your skybox textures as it will impact a lot on their quality.

Step 2 - Generating the displaylist
After we loaded our textures, we're going to generate a displaylist for our skybox.As you should know, displaylists are a lot faster than drawing the quads every single frame.

procedure TForm1.GenerateSkyBox(pWidth, pHeight, pLength : TGLFloat);
var
 px,py,pz : TGLFloat;
begin
List := glGenLists(1);
glNewList(List, GL_COMPILE);
 px := - pWidth  / 2;
 py := - pHeight / 2;
 pz := - pLength / 2;
 SkyBoxTexture[0].Bind;
 glBegin(GL_QUADS);
  glTexCoord2f(0, 0); glVertex3f(px,          py,           pz);
  glTexCoord2f(0, 1); glVertex3f(px,          py + pHeight, pz);
  glTexCoord2f(1, 1); glVertex3f(px + pWidth, py + pHeight, pz);
  glTexCoord2f(1, 0); glVertex3f(px + pWidth, py,           pz);
 glEnd;
 SkyBoxTexture[1].Bind;
 glBegin(GL_QUADS);
  glTexCoord2f(1, 0); glVertex3f(px,          py,           pz + pLength);
  glTexCoord2f(1, 1); glVertex3f(px,          py + pHeight, pz + pLength);
  glTexCoord2f(0, 1); glVertex3f(px + pWidth, py + pHeight, pz + pLength);
  glTexCoord2f(0, 0); glVertex3f(px + pWidth, py,           pz + pLength);
 glEnd;
 SkyBoxTexture[2].Bind;
 glBegin(GL_QUADS);
  glTexCoord2f(1, 1); glVertex3f(px + pWidth, py, pz);
  glTexCoord2f(1, 0); glVertex3f(px + pWidth, py, pz + pLength);
  glTexCoord2f(0, 0); glVertex3f(px,          py, pz + pLength);
  glTexCoord2f(0, 1); glVertex3f(px,          py, pz);
 glEnd;
 SkyBoxTexture[3].Bind;
 glBegin(GL_QUADS);
  glTexCoord2f(0, 0); glVertex3f(px,          py + pHeight, pz);
  glTexCoord2f(0, 1); glVertex3f(px,          py + pHeight, pz + pLength);
  glTexCoord2f(1, 1); glVertex3f(px + pWidth, py + pHeight, pz + pLength);
  glTexCoord2f(1, 0); glVertex3f(px + pWidth, py + pHeight, pz);
 glEnd;
 SkyBoxTexture[4].Bind;
 glBegin(GL_QUADS);
  glTexCoord2f(1, 0); glVertex3f(px, py,           pz);
  glTexCoord2f(0, 0); glVertex3f(px, py,           pz + pLength);
  glTexCoord2f(0, 1); glVertex3f(px, py + pHeight, pz + pLength);
  glTexCoord2f(1, 1); glVertex3f(px, py + pHeight, pz);
 glEnd;
 SkyBoxTexture[5].Bind;
 glBegin(GL_QUADS);
  glTexCoord2f(0, 0); glVertex3f(px + pWidth, py,           pz);
  glTexCoord2f(1, 0); glVertex3f(px + pWidth, py,           pz + pLength);
  glTexCoord2f(1, 1); glVertex3f(px + pWidth, py + pHeight, pz + pLength);
  glTexCoord2f(0, 1); glVertex3f(px + pWidth, py + pHeight, pz);
 glEnd;
glEndList;
end;
This part of the code is very easy.The vars px, py and pz are used to center the skybox.Then a simple cube with width pWidth, height pHeight and length pLength is compiled within our displaylist centered at 0,0,0 and the earlier generated textures are assigned to their corresponding sides.The first quad is the back of the cube, the second is the front, the third is the bottom, the fourth is the top, the fifth is your left side and the last one is the right side.

Step 3 - Drawing the skybox
After you have compiled your skybox cube into a displaylist, it's very easy to draw it :

procedure TForm1.DrawScene;
begin
ActivateRenderingContext(FDC, FRC);
glMatrixMode(GL_MODELVIEW);
glLoadIdentity;
glClear(GL_DEPTH_BUFFER_BIT);
glRotatef(xrot, 1, 0, 0);
glRotatef(yrot, 0, 1, 0);
glCallList(List);
SwapBuffers(FDC);
DeActivateRenderingContext;
end;


After activating our rendering context again, we switch to our modelview matrix and load the identity matrix.Then we only need to clear the depth buffer (and perhaps the stencil buffer, if you need it).You won't have to clear your color buffer anymore, as the skybox will fill the entire screen.Only things to do now are to rotate our matrix acording to the viewing angle of our viewer and to call the displaylist of our skybox.And after switching our buffers we see our skybox on the screen, which will add a big peace of realism to our scene.

One last thing to add to our scene would be an animated cloudlayer as seen in games like Quake 3 or Unreal.But perhaps I will show you this in a another tutorial.

The sample application
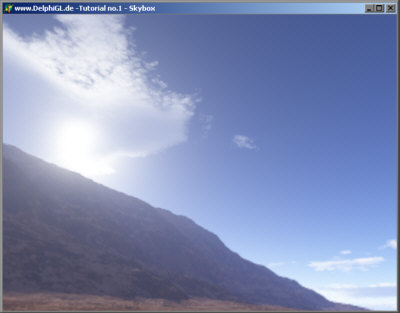
And at last a picture of our skybox in the sample app :


Note :
I used 512x512 textures for this screenshot.The textures included in the download package are only 256x256 and look therefore a bit washy, but I made this step to lower the filesize!

Download

Download the skybox demo including the sourcecode